

The Grand Canyon of Arizona, one of the natural wonder on planet earth, offers an unique challenge to hikers. While visitors can get a glimpse of it's beauty from the rims, many wish to go down the trail and negotiate the steep canyon edges to see how The Colorado flows through the heart of the Canyon.
Amid the COVID-19 pandemic, I teamed up with some of my hiking buddies to stay 2 nights at Bright Angel Camp and another 2 nights at Indian Garden. The weather is extreme during Winter & Summer, so we decided to go down there in March to avoid both cold and heat.
While all of my hiking buddies were experienced hikers. Their mission was to hike, camp and enjoy the nature. I had one additional in my mind, i.e. the photographing the canyon from deep inside. So when I showed up with my heavy DSLR, tripod and other photography gadgets in my backpack, they were concerned if I would be able to carry that much of extra load. Some even offered help to carry few of my items. I felt lucky to have such friend, but I assured them that I was ready for it.
Day One: Bright Angel Lodge, South RIM
I visited South Rim several times before but I always missed sunset view due to storm. However, this time the west sky was clear and the opportunity to photograph the sunset over the canyon popped up.
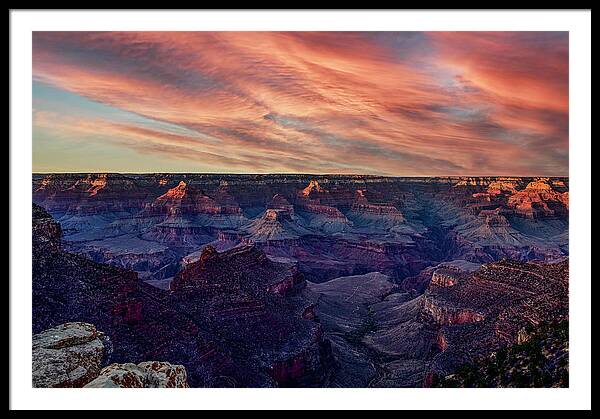 |
| Golden Evening Lights over the Canyon Edges |
The sunset view can be mesmerizing, especially when combined with cloud. You can purchase a print of this photo here. This was shot from Rim Trail, just outside Bright Angel Lodge. The Camera was mounted on a tripod and exposure metering was set to matrix with auto exposure bracketing for 5 shots at 0.7 EV each. The photos was latter processed & merged in Lightroom to balance the exposure in foreground & the sky.
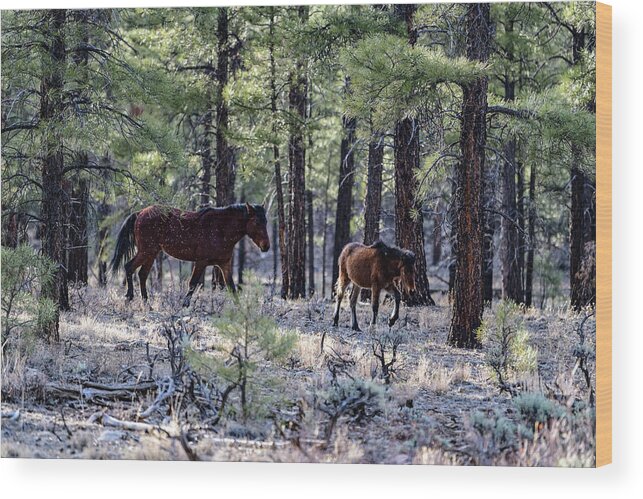 |
| Wild Horses near South Rim Entrance |
Grand Canyon is not known for many wildlife. I've heard about Mountain Goat, Mule Deer and Squirrel. I did not have any opportunity to photograph Mountain Goats before, so was carrying my 70-200 f2.8 lens, the lightest one that can be used for wildlife photography. We spotted these two magnificent animals just few miles inside after the south rim entrance. I had to change lens to get an appropriate shot. While I was busy in getting out the 70-200mm from my bag, my hiking buddies were already photographing them with their cellphone camera. By the time I was ready, the horses already veered off deep inside the forest. After several shots showing their back, I finally got this one when they decided to change direction. You can buy a print of this here: Wild Horses at Grand Canyon.
Day Two: To Phantom Ranch via South Kaibab Trail
We stayed in Bright Angel Lodge and wanted to catch the sunrise from South Kaibab next morning. So the wake up call was at 4:30am to be ready for the first Hiker Express leaving at 6:00am. We reached the pickup area by 5:45am but the authorities were running the buses only at half capacity due to COVID-19 restriction. Unfortunately, we couldn't board the first ride and we thought we would miss the sunrise. The buses came back after dropping the first batch of hikers.
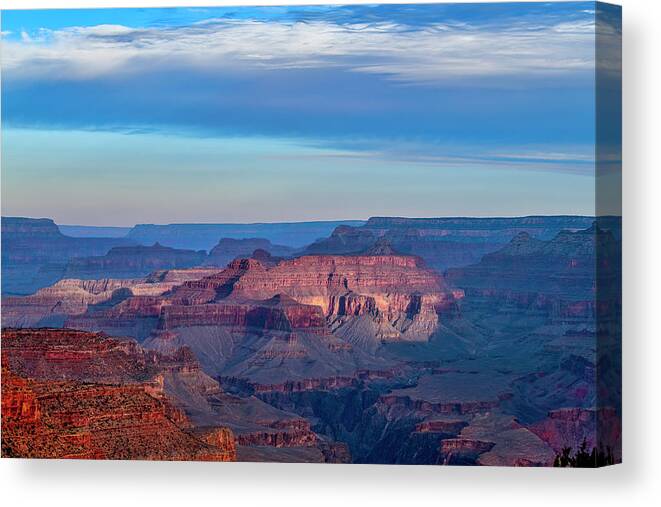 |
| Soft light over the Canyon from Sunrise |
When we reached the South Kaibab trailhead, the morning sun just broke from the cloud and hit the Canyon Edges. You can order a print Here
A mile down the trail a day hiker was coming up the trail. He took special interest in my camera gear and asked if I've photographed the goat. "I've not seen one yet" was my response. There, he pointed out the goat chewing the cud.
 |
| A Mountain Goat of The Grand Canyon |
About the halfway mark, the Mule Train came. You have to step aside towards the rocky side of the trail to let the Mules pass. So I took this shot from distance before giving them the right of way.
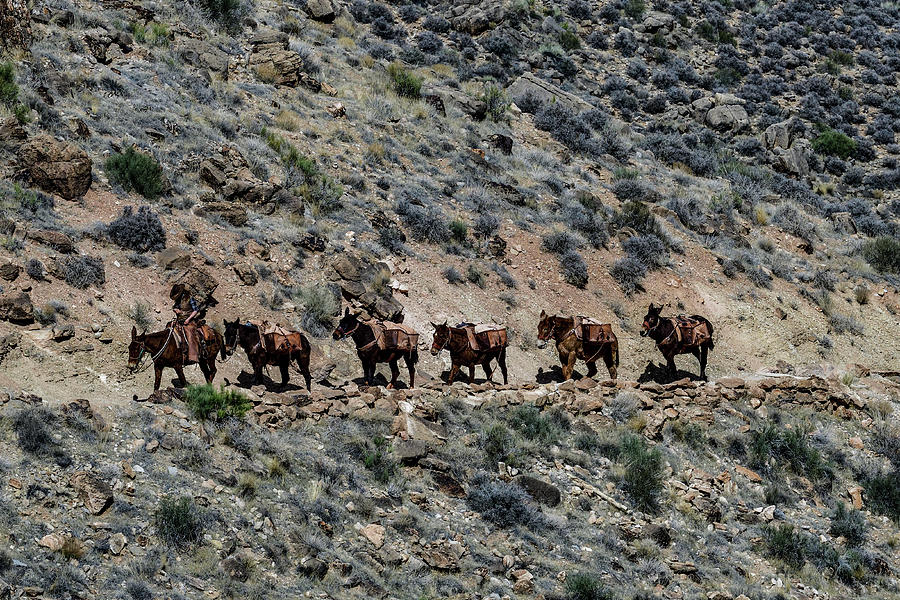 |
| The Grand Canyon Mule Train |
After 3 hours of hiking down on the trail the Black Bridge finally came into view. It was magnificent especially with the rafting boats docked on the beach.
 |
| The Black Bridge over the Colorado River |
We setup our camp in Bright Angel Campground, it looks amazing at night.
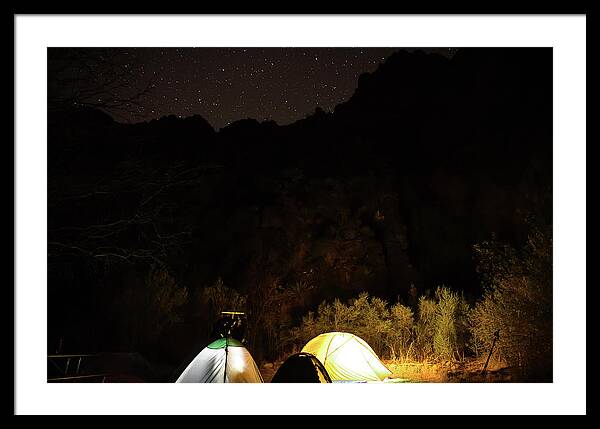 |
| Bright Angel Campground at Night |
Day Three: Phantom Ranch
I woke up around 4am and saw the starry sky. I realized that it was my best chance to shoot a star trail shot. It took me a short walk to find a spot from where I could see the Polaris aka the North Star. About 10 minutes into the shot, a group of early morning hikers came from the north and walked across my frame. I was sure the star trail were ruined but here is the 30 secs frame showing the hikers trail.
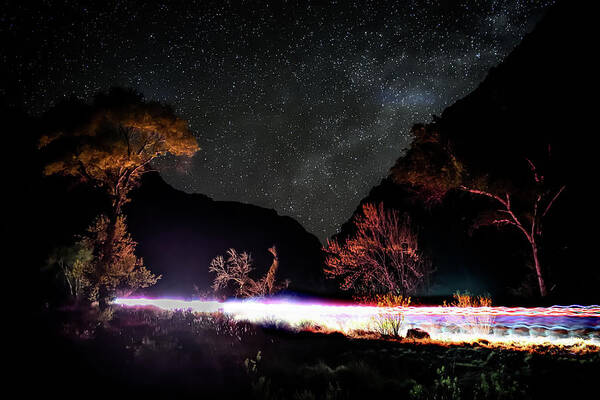 |
| Night Hikers from Cottonwood Campground returning to South Rim |
You can order an art print from this shot from Here
I had to restart my shot. I eventually had around 45 minutes of start trails before it was dawn.
 |
| Star Trail shot near Phantom Ranch |
Once I was done with star trail shot, I returned to my tent and decided to take the day easy. We started late after breakfast and hiked few miles on North Kaibab before returning to take the Clear Creek Trail to see the river from the top and the sprawling South Kaibab descending to the river.
 |
| South Kaibab Trail Descending to the River |
You can order a print of this Here. I did plan to attempt another star trail shot in the night but the cloud queen was laughing at me. The night was colder and the storm was waiting for us for the next night.
Day Four: Bright Angel Campground to Bright Angel Trail
It was a lazy start in the morning to break the tent and pack out toward Indian Garden. I spent some time to find the perfect spot to photograph the bridge. Eventually, I stopped when I was able to put both the bridges in the frame. As I fixed my tripod and got ready for the shot, a group of rafting boats drifted into the frame. I couldn't have asked for more and immediately captured this shot.
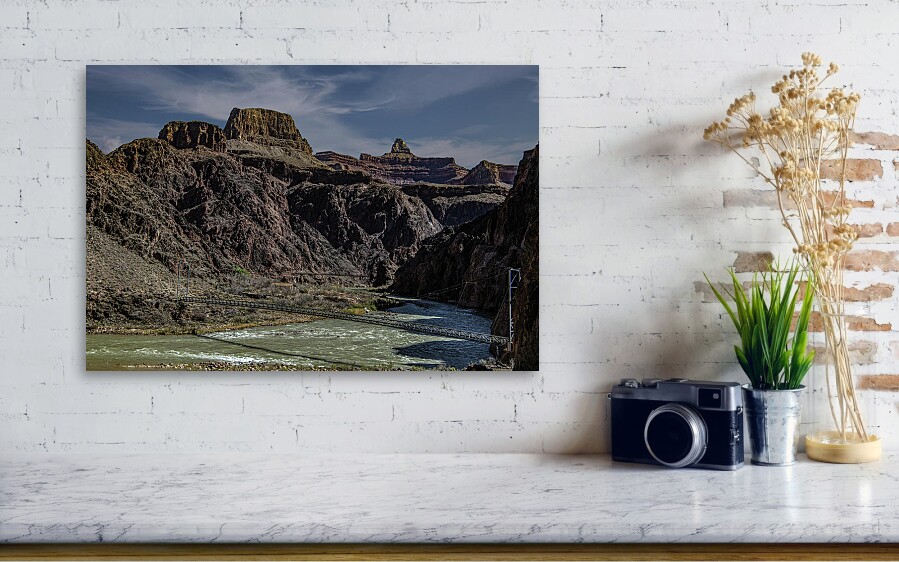 |
| The Twin Bridges over Colorado - Connects N. Kaibab to S. Kaibab & Bright Angel Trail |
The Bright Angel Trail is much easier than the South Kaibab until you hit the Devils Corkscrew which keeps climbing in multiple switchbacks. There is a waterfall on the Garden Creek but it's not easily seen by the hikers.
 |
| Devils Corkscrew and Garden Creek Waterslide |
You can order a print for this shot Here
When we reached Indian Garden campsite, we already knew that a snowstorm was coming at night over the south rim, but down there at campsite, it was safe to stay. Any photographer would consider storm an impending storm is an opportunity to photograph something spectacular. I did not wanted to miss sunset view from Plateau Point.
 |
| Storm Cloud and Canyon Edges illuminated by Sunset Light |
You can order a print for this Here
The rain started probably around 8pm. We could hear high wind flowing over the trees but our tents were safe. The Indian Garden campsite is almost inside a fortress due to canyon walls covering 3 sides and the trees. You could hear the storm but you won't feel it.
Day Five: Around Indian Garden Campground
We did not see the sun on the next day. The spent the morning mostly in tent or in the picnic table under the shed. The storm started clearing in the afternoon. It was time to photograph some clearing storm over the canyon.
 |
| A Raptor Flying Over The Canyon |
When I spotted the bird going into the storm cloud, I was hoping it is the famous California Condor but once I looked through my lens for a clear view, it turn out to be a Kite.
| Snow over south rim - shot from Indian Garden Campsite |
As I turned toward South Rim, we could see the snow deposited by the storm. That gave us the clue that the next morning it would not a a normal hike to return to the top. I was beginning to debate with myself, if I should pack my camera in the backpack to negotiate the icy trail.
Before returning to the tent I had a sort interaction with these two permanent residence of The Grand Canyon's Indian Garden.
 |
| Grand Canyon Mule Deer |
 |
| The Rock Squirrel of Grand Canyon |
Day Six: The Hiking Out
The next morning was bright and sunny. We started hiking out around 9am. The late start was in the hope some icy spot on the trail would be cleared by the time we would reach there. But that was unrealistic as the top portion of the trail does not get sunlight until late afternoon. This was one the last shot I took at 3 miles Resthouse before I decided it was for my safety to put away the DSLR inside the backpack.
 |
| The Three Miles Resthouse on Bright Angel Trail |
Then it was all about negotiating an icy trail with hiking sticks. We reached the top around 1pm. My shoulders were thanking me as soon as I put the backpack down.


